
The Internet of Thinks (IoT), using and iPhone, Siri, HomeBridge, MQTT and an Arduino – Part 1
Note: This post, and the next one (part 2), are obsolete. They have been replaced by this one, offering a simpler method to get started. They are left here for reference.
The global project is shown in this drawing:
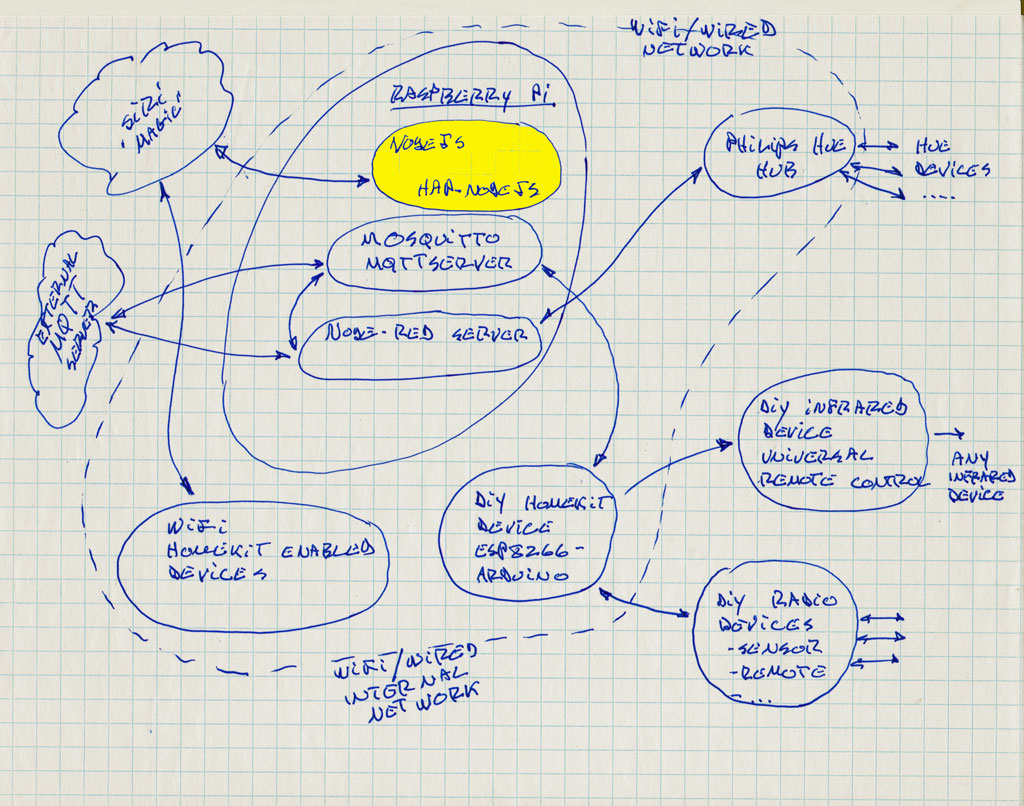
Part 1 (this article) is in yellow. Part 2 (next article) will cover the Mosquitto server (just below) and the DIY HomeKit Device. The rest will be detailed in future articles, over the next few weeks.
This is my initial project involving the Internet of Thingd (IoT). Basically, as a first IoT project, I wanted to control a light using Apple HomeKit (thru Siri).
The idea is simple: Tell Siri to turn a light On and Off.
The execution is not that simple.
There are quite a few bits of software that have to communicate:
- Your iPhone has to talk to the Siri server
- Siri has to find your HomeKit server, running on a Raspberry Pi
- Homekit has to communicate with an MQTT server, running on the Pi (or not)
- The MQTT server has to communicate with your HomeKit accessory. An Arduino in this case, using the ESP8266 Wifi chip.
Let’s look at these in more details:
1. Your phone has to talk to the Siri server
Any phone that can talk to Siri will do, but homekit is only available on iOS 8 and newer. Most iPhone should be OK (I’m currently using it on iPhone 4s, 5 and 6s). If your running iOS 10 or above, you also have the native HomeKit application available.
2. Siri has to find your HomeKit server, running on a Raspberry Pi
The HomeKit server emulates a HomeKit bridge (like this). There are many ready-made HomeKit bridges offered as an interim solutions until devices start incorporating the software into the hardware (Philips Hue, Elgato Eve, Lutron Caseta). But most of them are not Open Source and most will only work with their hardware. So we use HAP-NodeJS to emulate a HomeKit bridge on a Pi. This will allow us to simulate a “general” HomeKit interface. The goal is to be able to talk to our own hardware, but also to program our way into other HomeKit Bridges, like the Philips Hue.
The HomeKit server, or HomeKit emulator, receives and sends information and command from/to the internet, from/to the Siri servers. That’s the magic of Siri: you give it commands and it will find the proper device through the network into your home! Communications work both ways: devices can report their status to the Siri servers, and those will let you know what is happening. More info on Apple’s site.
I installed the HomeKit server on a Raspberry Pi. It could be installed on any Linux server, although I had all sorts of trouble installing it on Ubuntu 14.04 or 16.04. Installing it on a Pi using the instruction below was easy.
3. HomeKit has to communicate with an MQTT server, running on the Pi (or not)
How that you have Siri communicating with a server in your house, you need to talk to a server that will translate the Siri info and commands into messages exchanged with your electronic gadgets. For this, we use MQTT, a (fairly) simple protocol that will exchange simple messages with the actual devices.
The MQTT server will act as a bridge between your electronic thing (in this case an Arduino) and the HomeKit bridge. Basically, the device that you want to control has to “subscribe” to a topic (a class of messages, if you want). Subscription can work both ways. The device will then “listen” for messages on the appropriate topic. It can take action on the messages received.
I installed an MQTT server (mosquitto) on my Raspberry Pi. You could use any MQTT server (even Adafruit IO) but I prefer to have control over it and I already had the Pi running with HAP-NodeJS. On top of that, having the MQTT server “in house” protects my devices from a random “ Internet Down” problem, unfortunately quite common here, in the back country. Installation is based on this article.
4. The MQTT server has to communicate with your “fake” HomeKit accessory
The MQTT server is listening to both the HomeKit server (that communicates with Siri) and your actual electronic device. So the electronic device had to be able to understand MQTT. In this experiment, I use an Adafruit Huzzah Esp8266 micro controller. It’s a small, cheap device (10$) that has Wifi on board, and an Arduino compatible micro-controller.
Someone has developed an MQTT library for the Arduino, so it can talk with the MQTT server. Basically, you want your Arduino, through its Wifi connection, to listen to your network for certain “messages” only, from your MQTT server. That’s what MQTT is all about! You might also want your Arduino to send MQTT messages on the Wifi. For example, your Arduino might let the network know that the LED connected to it is currently ON. Then the MQTT server will know that the LED is ON, and this will trickle up all the way to Siri, who might tell you that the LED is on, if you ask nicely…
Technical requirements:
- An iPhone with iOs 8 or newer
- a Raspberry Pi (but it could be any Linux server)
- a micro-controller with Ethernet connection. In this experiment, I used an Adafruit Huzzah ESP8266 (but I’ll expand on this)
Part 1 Setup your HomeKit server on a Raspberry Pi
I use a Raspberry Pi 2, with Respbian Jessie downloaded from the raspberry.org site. It comes with an old version of Node.js but HAP_Node.js requires a newer version.
If you’re not certain about what you have, Try these commands:
What processor am I using?
uname -a
Wheezy or Jessie version of Rasbian?
lsb_release -a
So, in sequence, the whole series of commands is:
Keep your Linux up to date:
sudo apt-get update
sudo apt-get upgrade
I then installed Node 4.6.0. But you could install the latest version if you want. My RaspPi is running on an ArmV7 processor.
Via sources
wget https://nodejs.org/dist/v4.6.0/node-v4.6.0-linux-armv7l.tar.gz
tar -xvf node-v4.2.1-linux-armv7l.tar.gz
cd node-v4.2.1-linux-armv7l
sudo cp -R * /usr/local/
or via package manager as root from official repo which is what I tested last.
sudo apt-get install curl
curl -sL https://deb.nodesource.com/setup_4.x | sudo -E bash -
sudo apt-get install --yes nodejs
For a more current version of node, replace the version numbers above.
as in
curl -sL https://deb.nodesource.com/setup_7.x | sudo -E bash -
I tested with version 7.2.0 and everything was fine. To check if Node.js is properly installed and you have the right version, run the command:
node -v
Install a few libraries and modules:
sudo apt-get install git-core libnss-mdns libavahi-compat-libdnssd-dev
Then install (update) a few node modules (-g for general installs):
sudo npm install -g npm
sudo npm install -g node-gyp
and next, we download the actual HomeKit bridge from HAP-NodeJS ( make sure you are in your Home directory:
cd ~
The maker of HAP-nodeJS has prepared an npm package for easy installation with the proper dependencies
so you can try:
sudo npm install hap-nodejs
I had success with that. If it works, jump the manual install below and go to the test part.
Otherwise, you can do it manually, but some of the dependancies may have changed:
git clone https://github.com/KhaosT/HAP-NodeJS.git
cd HAP-NodeJS
npm rebuild
sudo npm install node-persist
Manual install also means that you have to install a bunch of commands for missing modules, all to be executed in order:
sudo nom install bignum
sudo npm install srp
sudo npm install mdns --unsafe-perm
sudo npm install debug
sudo npm install ed25519 --unsafe-perm
sudo npm install curve25519 --unsafe-perm
Test part: This completes the installation of the main Siri interface server. You should now have, in your home directory, a “node-modules” directory. In this directory, you will find another one named “hap-nodejs”. The executable node code for the server is there. Type:
DEBUG=* node Core.js
This should start the HAP-nodejs server. You should see a response like this:
pi@raspberrypi2:~/node_modules/hap-nodejs $ DEBUG=* node Core.js
*** WARNING *** The program 'nodejs' uses the Apple Bonjour compatibility layer of Avahi.
*** WARNING *** Please fix your application to use the native API of Avahi!
*** WARNING *** For more information see <http://0pointer.de/avahi-compat?s=libdns_sd&e=nodejs>
*** WARNING *** The program 'nodejs' called 'DNSServiceRegister()' which is not supported (or only supported partially) in the Apple Bonjour compatibility layer of Avahi.
*** WARNING *** Please fix your application to use the native API of Avahi!
*** WARNING *** For more information see <http://0pointer.de/avahi-compat?s=libdns_sd&e=nodejs&f=DNSServiceRegister>
HAP-NodeJS starting...
Parsing accessory: Fan_accessory.js
Parsing accessory: GarageDoorOpener_accessory.js
Parsing accessory: Light_accessory.js
Parsing accessory: Lock_accessory.js
Parsing accessory: MotionSensor_accessory.js
Parsing accessory: Outlet_accessory.js
Parsing accessory: TemperatureSensor_accessory.js
Parsing accessory: Thermostat_accessory.js
If this is not followed by a fatal error, because of a missing module, you’ve just completed the first part of the setup. On your iPhone (or iPad), start the HomeKit application. From the main screen, tap the + in the upper right corner and chose “add accessory”. You should see the accessories enumerated above.
Nice work of home lights automation.I shall try to work with your guidelines above,thanks
home automation hyderabad
Nice Guidelines Given. We Will Definitely Try To Follow This.
Thanks & Regards
https://smartnode.in/