
Simplifying the IoT setup
A new version of the IoT server
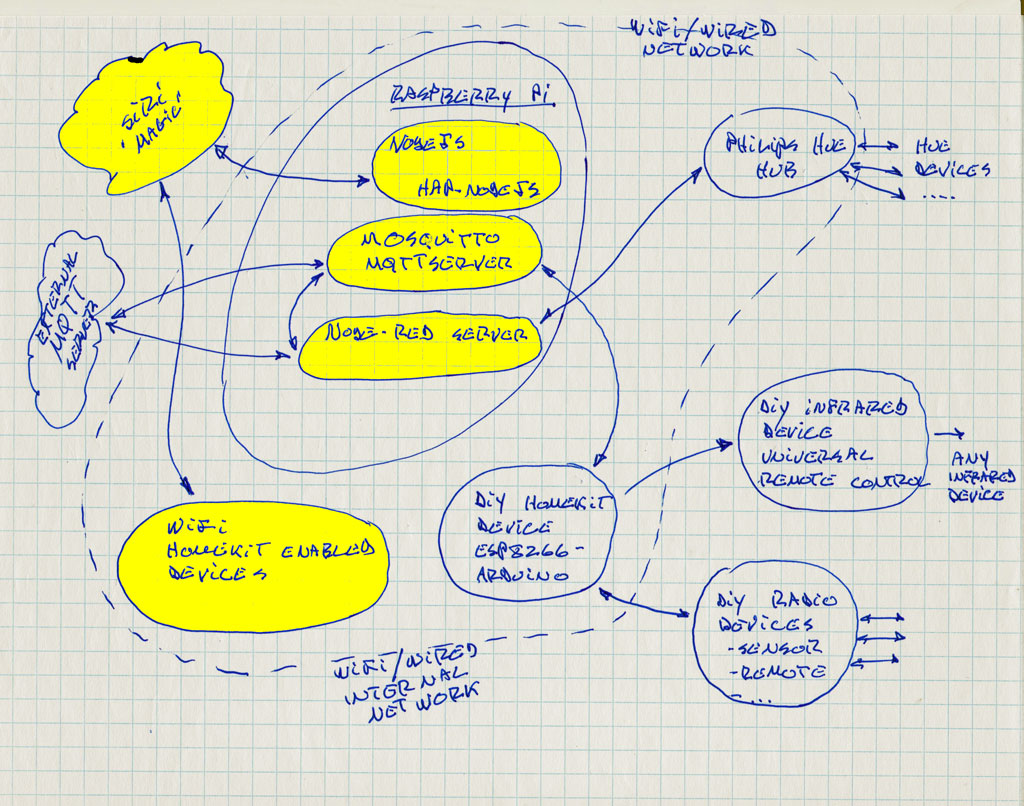
The goal of this project is to install a Internet of Things (IoT) server that can control “things” AND, more importantly, communicate with Apple’s Siri and HomeKit. Initially, we will install a server on a Raspberry Pi. This server uses node.js extensively, but instead of doing all the programming ourselves, we use existing code, with node-red and plugins as an interface. Node-red will handle communications between node.js programs, the hardware of our IoT things and Apple Siri (and HomeKit).
In my system, I use node-red to control (and read data from) my own IoT things. I then use node-red (node.js/json/some programming) to process that information. I also use MQTT to exchange information between devices (to/from IoT things and between them). Then I use Homebridge to send and receive information with HomeKit/Siri. I then use Home, the HomeKit program from apple, to control everything automatically.
It’s a lot of technology, but actually very little setup and programming. I use pre-made utilities (thanks to every one who develops all this!).
In two previous posts (here and here), I explained how to setup a simple server, running on a Raspberry Pi (2 or 3), that would serve as a bridge to Apple Siri to control HomeKit accessories. Since the posts were published, many contributors have worked hard to integrate software components on various platforms. Raspberry Pi is evolving through its software packages. Apple is even talking about opening up HomeKit (a bit). This leads to things like Ikea Tradfri connecting to HomeKit.
This post is about a new installation procedure for installing node-red, Homebridge (HAP-Nodejs) and MQTT on a Raspberry Pi. I tested the procedure and was able to get a working HomeKit Server in about an hour! Of course, if you read this article a year (a month?) after I published it, the procedure might be even simpler! I will update this post if I find a better procedure.
Configuring the Raspberry Pi as our IoT server
I use a Raspberry Pi 2 as my home server. The Pi 3 can be used interchangeably and the Pi Zero should work too (not tested). I just happened to have a 2 in stock and I don’t mind having the server linked to my network with a cable instead of Wifi.
The simplest procedure to initially configure the Pi is described on raspberry’s web site. Basically, just download Raspbian and install using Etcher. I’m using Raspbian Jessie, from that link. Please download the full version, with the graphical interface.
A couple of tricks
Although you can setup your server using the graphical interface on your Raspberry Pi, most of the procedure described here is done via the command line, in Linux, running on the Raspi. If you are uncomfortable with the command line, you probably should not work on this project anyway. Spend some time working in command line mode and come back!
I prefer to configure and maintain my servers using the command line only, and I also prefer to do this remotely. This allows me to have servers and remote stations anywhere on the network, without having to connect them to a screen or keyboard. Just after you burn the operating system on the micro-SD card, and before you put it in your Pi, I suggest you slightly modify the “Boot” partition. All you need to do is take the SD card out of your computer and re-insert it. The computer should show you a “Boot” disk on Windows or MacOS.
Newer version of Jessie disable ssh by default. To activate it, add a file called “ssh” to the Boot disk/partition. Just en empty file. In Linux/MacOS: “touch ssh” will do it. This will activate ssh on the first boot of your Raspi. The file will be deleted automatically after that. This way, you can do all the configuration from the command line, remotely.
You can also modify a file and boot with Wifi already activated. Read the answer in this link.
After the initial boot, you will need to get the IP address of your new Raspi. This will vary greatly depending on your network configuration, but in general, your router should show you a new device on the network with its address. If you can’t find it, boot you Pi attached to a screen (use the HDMI connector) and find its IP address by opening a terminal console and typing
ifconfig -a
From now on, you can access your Pi using Putty on Windows, Terminal on a Mac, and the command line in Linux. I even use an iPad sometimes. You might want to disable the graphical interface (normal boot mode). But you will want to keep the graphical interface setup on the Raspi. If you use a graphical dashboard, running on the Pi, you will want to boot in graphical mode.
ssh pi@192.168.2.xxx <=replace with IP address of your Pi!
It’s now time to adjust you Pi to your time zone and change its network name and change the default password. Use
sudo raspi-config
And now we install some software!
Installing IoT Software
Were are going to use node-red, Mosquitto/MQTT and homebridge on the server.
But first, learn to use
sudo apt-get update

sudo apt-get upgrade
and use these two commands every time you install new software on your Raspberry Pi. The first one update the software catalogs (repositories) and the second one upgrades installed packages, as needed. This will keep you Pi up to date.
Node-red
Node-red is the visual programming interface that I use.
Node-RED is a programming tool for wiring together hardware devices, APIs and online services in new and interesting ways.
It provides a browser-based editor that makes it easy to wire together flows using the wide range of nodes in the palette that can be deployed to its runtime in a single-click.
As of this writing, Raspbian Jessie comes with node-red pre-installed, but the installed version of node.js is an older one. Node.js is necessary to run node-red and the rest of our IoT stuff. The old version of this post made you install node.js “by hand”, but it’s now all included in a nifty process already present on your Pi:
update-nodejs-and-nodered
This is a marvellous script! Read the details here.
If the previous command doesn’t work, try: (read about it here)
bash <(curl -sL https://raw.githubusercontent.com/node-red/raspbian-deb-package/master/resources/update-nodejs-and-nodered)All we really need now is to have node-red start when the Pi boots. This is very simple on a recent version of Jessie:
sudo systemctl enable nodered.serviceReboot to activate the service (and check for errors, while you’re there).
sudo reboot
If you want to play with node-red now, please go ahead. There are many tutorials available. One in particular, from IBM, explains the whole setup of an intelligent doorbell. Read it to get an idea of what the rest of the project is going to be. My install procedure is simpler, but the explanations of both hardware and software usage are excellent.
Mosquitto
MQTT, which originally was an acronym for Message Queue Telemetry Transport, is a lightweight message queue protocol designed for small data packets sent across high latency, low bandwidth links. MQTT is a fairly simple protocol and it’s perfect for Internet of Things projects.
MQTT will allow us to exchange information, using a simple protocol, between the component of our IoT system. It’s as simple as sending a message like “light1/On” or “light1/Off”. MQTT takes care of the synchronisation, message storage, etc. The syntax is really simple. Mosquitto is the “most better version” of an MQTT server for the Raspberry Pi.
Mosquitto is now available on the main Raspbian repository, so installation is very simple:
sudo apt-get install mosquitto mosquitto-clients
Mosquito will install its service and will be there at reboot.
Homebridge
Homebridge is a lightweight NodeJS server you can run on your home network that emulates the iOS HomeKit API. It supports Plugins, which are community-contributed modules that provide a basic bridge from HomeKit to various 3rd-party APIs provided by manufacturers of “smart home” devices.
Since Siri supports devices added through HomeKit, this means that with Homebridge you can ask Siri to control devices that don’t have any support for HomeKit at all.
Homebridge is quite invisible on the server. IT runs in the background and is seen by Apple’s HomeKit application Home as a standard bridge. So when we create new IoT accessories, they are made visible in the Home application exactly as if you had bought them! We will communicate with Homebridge using an MQTT plugin. This way, we can configure and communicate with it.
Install Homebridge
In the previous version of this procedure, I installed HAP-nodejs separately. This is now included in Homebridge installation. The Homebridge installation is well detailed by its creator here (and here for a semi-manual install on a Raspi). Basically, it’s just:
sudo apt-get install libavahi-compat-libdnssd-dev
sudo npm install -g --unsafe-perm homebridgeThe “ npm” command (I think it’s an abbreviation for “node program manager”) is used to install node.js modules. Homebridge installation will take care of the dependancies (like HAP-nodejs). The -g parameter is important. This will install Homebridge globally. This is important to be able to get it going on boot.
Make Homebridge execute at boot
Since we also want Homebridge to start at boot, we need to do a few more things. The details are here. Please read them. It looks complicated but it’s just two files and a directory that need to be created:
Download the two files at the top of the page and place homebridge under /etc/default and homebridge.service under /etc/systemd/system on your Raspberry Pi. This is how a service is created on newer versions of Jessie.
You can also copy and paste the code:
-
sudo nano /etc/default/homebridge
and copy this code into the file
# Defaults / Configuration options for homebridge
# The following settings tells homebridge where to find the config.json file and where to persist the data (i.e. pairing and others)
HOMEBRIDGE_OPTS=-U /var/lib/homebridge

# If you uncomment the following line, homebridge will log more
# You can display this via systemd's journalctl: journalctl -f -u homebridge
# DEBUG=*
Then do
-
sudo nano /etc/systemd/system/homebridge.service
and copy this code into the file
[Unit]
Description=Node.js HomeKit Server
After=syslog.target network-online.target

[Service]
Type=simple
User=homebridge
EnvironmentFile=/etc/default/homebridge
# Adapt this to your specific setup (could be /usr/bin/homebridge)
# See comments below for more information
ExecStart=/usr/local/bin/homebridge $HOMEBRIDGE_OPTS
Restart=on-failure
RestartSec=10
KillMode=process

[Install]
WantedBy=multi-user.target
In order to use the systemd service as is, the following folders and user have to exists:
- A system user named “
homebridge". You can easily create this user withsudo useradd -M --system homebridge - A directory called
/var/lib/homebridge, writable by the user created above, and a correspondingconfig.jsonfile in that directory. Homebridge by default looks for its configuration in/home/<username>/.homebridge. This is unsuitable for services and the-U /var/lib/homebridgeflag ensures the config is read from a different place.
sudo mkdir /var/lib/homebridge

sudo chmod 755 /var/lib/homebridge
Then Enable and run the service (first time) with the following commands:
systemctl daemon-reload
systemctl enable homebridge
systemctl start homebridge
You can check the status of the service by calling
systemctl status homebridge
On subsequent reboots, it should start automatically, if not, use the journalctl -u homebridge to check the error cause, or look into /var/log/syslog.
Our Homebridge installation needs a bit more configuration.
Configuring Homebridge
cd /home/pi
This is the main directory for user Pi. We will configure Homebridge here and then copy the file to the proper directory.
cd .homebridge
This is a hidden directory. Because of the “.” in front of the name. The directory will probably be empty unless you tried starting Homebridge. We will create a basic configuration file:
sudo nano config.json
and the copy these json lines into the file:
{
 "bridge": {
    "name": "Homebridge",
    "username": "CC:22:3D:E3:CE:30",
    "port": 51826,
    "pin": "031-45-154"
 },

"description": "This is the MQTT connector",
 "platforms": [
 {
    "platform": "mqtt",
    "name": "mqtt",
    "url": "mqtt://192.168.2.xxx”, <= address here
    "topic_prefix": "homebridge",
    "username": "foo",
    "password": "bar"
 }]
 }
If you were to use Homebridge by itself, without node-red, you would need to reference your accessories in the configuration file. But we will be doing all this in node-red and it will take care of the interface for us. Also, since we made Homebridge bootable as a service, we need to copy this configuration file in the directory we created earlier:
sudo cp /home/pi/.homebridge/config.json /var/lib/homebridge
and then make the file available to the new user we created:
sudo chown homebridge:homebridge /var/lib/config/config.json

sudo chmod 755 /var/lib/homebridge/config.json
Finally, we need to install 3 plugins for our server. The first 2 are important and the third one is optional, but we will use it later as an example.
Installing IoT plugins
Installing plugins for node is done using “npm”. Note that node-red plugins are node modules, so are installed the same way, except for the -g parameter.
First, we will install a plugin to let MQTT communicate with homebridge:
sudo npm install -g homebridge-mqtt
then a plugin to install a nice dashboard in node-red:
cd /home/pi/.nodered
Notice the “.” in front of the directory name. This is another “hidden” directory. Make sure that you are installing this plugin in that directory. Actually it will be installed in a sub-directory called “node_modules”. But installing it here will make this plugin available to node-red, and will create the proper visible functions. In the future, when you install a node-red plugin, come back to this directory.
npm install node-red-dashboard
Then we install a small plugin to play with our completed installation:
npm install node-red-node-weather-underground
We’re done!
The next post will contain examples.
Trying to follow along and get this to work. A few things I ran into….
I could not do any of the following commands without using ‘sudo’ in front of them:
systemctl daemon-reload
systemctl enable homebridge
systemctl start homebridge
Will that cause problems? It was asking me for the root password, and I don’t know it.
Second, and this is where I had to stop, under the section “Configuring Homebridge”, your expecting a folder “.homebridge” in “/home/pi”. I don’t see where/when that folder was created. I see a similar folder created as var/lib/homebridge. Is that the folder? Should there have been a .homebridge folder created either by me or by one of the previous steps?
Thanks,
Jeff
For the systemctl commands, it is possible that you have to use “sudo”. The password is the one for your main user, that was created when you initialized the Raspberry Pi. That user has “root” privileges.
For the other question: when you issued the command “sudo npm install -g –unsafe-perm homebridge” you should have been in your /home/pi directory. It should be OK since you rebooted a few commands ago. Now, to check if the directory is there, do the following:
cd /home/pi
ls -la
The second command will list all directories under /home/pi. The directory .homebridge is a hidden directory, because of the “.” in front. it should be visible now. If not, can you post the results of the ls command?
very interesting, could you make part2, thank you