The project evolves around an Arduino micro-controller. I use the Duemilanove because that’s the one i had on hand. It would work with any Arduino or Arduino-compatible board. Whatever is available and cheap. They sell for less than 30$.
The Arduino will let you transfer midi data through it’s digital outputs, but to simplify things, I purchased a midi interface compatible with the Arduino. The SparkFun midi breakout board:
You could build your own quite easily. The secret to midi is the opto-isolator on the midi-in port. The idea, from the official midi documentation, is to isolate the signal, and prevent ground-loops (hum) between midi devices. The midi-in port usually does that with an opto isolator. This board is just that. Call me lazy…
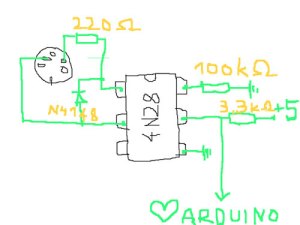
The circuit on the input side is quite simple (thanks to KUK). The 4N28 is the opto-isolator:
The midi output is a direct connect to the socket pins.
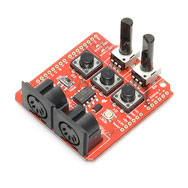
If you want to experiment a bit more, you could get the SparkFun midi shield below. It includes 3 switches and 2 potentiometers so that, with a little bit of programming, you could send midi data to your computer within a few minutes.
The idea here is to use simple programming to send midi data to the midi port, either to control a midi instrument or to send midi data through the USB port to a computer. The Arduino by itself can do all this, but the shields provide a simple way to connect to other midi equipment.
Here’s my board and shield:
This is how the shield fits on the Arduino:
To connect to midi equipment, I had many choices. I could do a straight connect from the Arduino, or use a midi cable, or use a USB port since my computer doesn’t have a midi port. The midi interface cable found first was this one:
This is a typical midi-to-USB interface. It has the necessary circuit to connect to USB, and provides midi in and out. This one is an M-Audio Uno. It is quite expensive (˜40$) but uses good quality parts. You can find equivalent devices that will do the job just fine on EBay for 5$ to 10$. Remember, midi data is digital. No audio! So as long as the signal can pass 0 and 1’s to the other connector, you’re in business. The other advantage of the M-Audio is that it has 6 feet long (a couple of meters) midi cables attached. If you think about it, it’s a cheap way to get cables.
The idea for the first part of the project is to test compatibility between the circuit and the computer, using the midi-to-USB device, which would in turn guaranty that the midi-to-midi works.
So, here’s the circuit:
Note: for the first test, you don’t even need the midi shield. If you plug the Arduino to the serial port for programming, it will send data up the port when the program runs. To do this with the code below, just open the terminal window in the Arduino window. You will see data pass through.
To fully view the midi data, just download this little (free) program: http://www.snoize.com/MIDIMonitor/
You will be able to see exactly what goes through your midi port. I always have it open. Lots of debugging…
What you should see in Midi-Monitor:
And here’s the code:
/*
 * Convert Arduino to a MIDI controller using a digital input.
 *
 * This sketch is set up to send a MIDI note on MIDI channel 1,
 * but it can be easily reconfigured for other notes and channels
 *
 * 2011/3/2; Rpbert Turenne
 */

// define the pins we use (any will do)
int switchPin1 = 4;

// general midi notes
char note1 = 60; //Middle C
char note2 = 62; //D
char note3 = 64; //E
char note4 = 65; //F
char note5 = 67; //G
char note6 = 69; //A

// Variables
int switchState1 = LOW;
int currentSwitchState1 = LOW;

void setup() {

 // set the states of the I/O pins:
 pinMode(switchPin1, INPUT);

 // set MIDI baud rate : IMPORTANT FOR MIDI
 Serial.begin(31250);

}

void loop() {

 //switchPin1
// Just some logic to toggle the value on any switch signal
 currentSwitchState1 = digitalRead(switchPin1);
 if( currentSwitchState1 == LOW && switchState1 == HIGH ) // push
 //Note on channel 1 (0x90), some note value (note), middle velocity (0x45):
 noteOn(0x90, note1, 0x45);
 if( currentSwitchState1 == HIGH && switchState1 == LOW ) // release
 //Note on channel 1 (0x90), some note value (note), silent velocity (0x00):
 noteOn(0x90, note1, 0x00);
 switchState1 = currentSwitchState1;

}

// Send a MIDI note-on/off message.
void noteOn(char cmd, char data1, char data2) {
 Serial.print(cmd, BYTE);
 Serial.print(data1, BYTE);
 Serial.print(data2, BYTE);
}


